Straighten Teeth in a Photo Without Looking Fake (2026)
One crooked tooth, one good photo
Upload the picture and the AI Teeth Fixer evens out only the teeth. Face, hair and background stay as they were.
Fix teeth in a photo →You have a photo you like. The light is right, the expression is right, and one front tooth sits a little off. Fixing it takes a minute. The part that goes wrong is what happens next: the smile comes back evenly white and perfectly spaced, and your friends say it looks like someone else.
Straightening is easy now. Stopping at the right point is the skill. Below are the four things to look at after any teeth edit, what the usual methods cost you in time, and the cases where you should leave the teeth alone.
The four checks after you straighten teeth in a photo
Zoom to 100% on the mouth and go through these in order. Each one catches a different kind of fake.
1. Tooth width
When a gap closes or a tilted tooth turns, the AI has to find room for it. Often the answer is a wider tooth. A front tooth that is clearly broader than its partner reads as odd even when the row is now straight. Compare the two central incisors: they should be close in width, with a small natural difference.
2. The midline
Find the line between the two upper front teeth and check it against the center of your nose and the dip in your upper lip. People are rarely perfectly aligned here, and a small drift looks normal. A midline that jumps to a new position looks wrong right away, because you have seen your own face many times.
3. Lip line and gums
The edit should stop at the teeth. Look at where the upper lip meets the gum, and at the corners of the mouth. If the lip shape moved, or the gum edge got smoother than the rest of your skin, the edit touched more than it should.
4. Shade against the room
Teeth take the color of the light. In a warm evening photo they should be warm. Compare them to the whites of the eyes: teeth brighter than the eye whites look like veneers. If the photo has a yellow cast, white teeth will stand out as pasted in.
What a real straighten-and-gap edit looks like
The pair below is an uneven row, shown at mouth level. The edit evens the row and keeps the lips, the beard and the skin texture exactly as they were. Notice what did not change: the lip line, the shadow under the upper lip and the tooth shade all match the original.
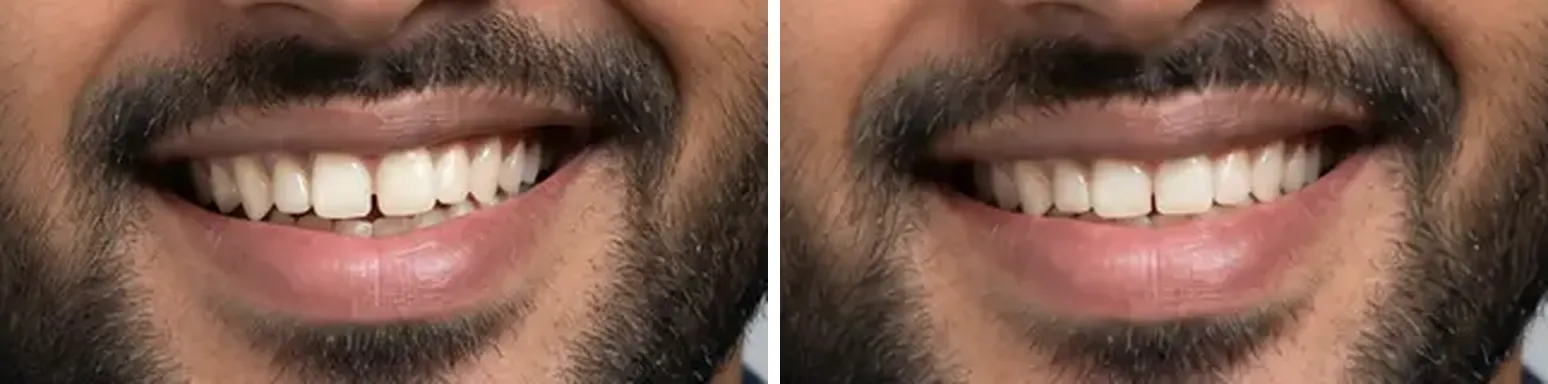
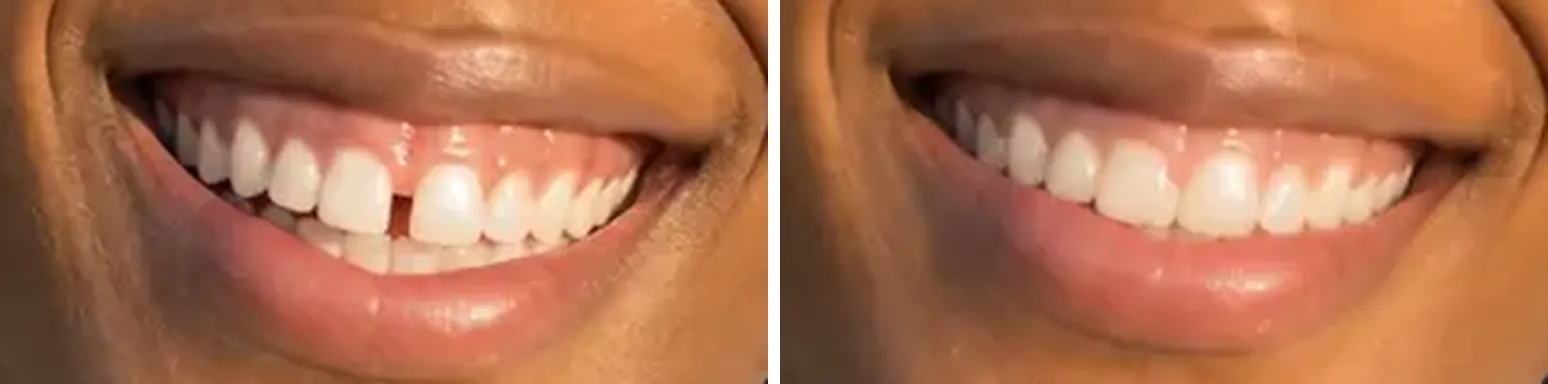
Gaps are where check 1 earns its keep. In the next pair the gap between the upper front teeth is closed. It works, and the two central teeth now take a little more room than before. That is the trade every gap fix makes, and the reason to look at width before you post.
Three ways to do it, and what each costs
| Method | Effort per photo | Where it fails |
|---|---|---|
| Photoshop Liquify or warp | Longest, tooth by tooth | You drag each tooth by hand. Pushing one tooth smears its neighbor, and the lip bends with it. |
| Generative Fill on a selection | Medium, with retries | The prompt decides the outcome. A vague prompt like "fix teeth" can return a different mouth entirely, and you pick from variations. |
| One-step AI teeth fixer | Shortest, one step | You get one result and no sliders. The four checks above are how you judge it. |
Photoshop is still the right call for a paid headshot where you need control over each tooth. For a photo you want to post today, a one-step tool saves most of the time. If you have never used either, our guide to editing a photo with AI shows the general workflow.
Straighten teeth in a photo with the AI Teeth Fixer
- Pick a sharp photo. Open the AI Teeth Fixer and upload a JPEG, PNG or WebP where the teeth are visible. A sharp, evenly lit face gives the AI the enamel and gum line it needs.
- Run the edit. The tool has no prompt box. It already carries an instruction that changes only the teeth, so you do not have to word it yourself.
- Run the four checks. Zoom to the mouth: tooth width, midline, lip line, shade.
- Run it again if one check fails. Each run gives a new result, so a failed check is not the end of the edit.
The tool changes pixels in the picture. It does not change your real teeth, and it is not dental advice.
When you should leave your teeth alone
- Dental or orthodontic marketing. If the photo is used to show a treatment result, an edited smile misleads the viewer. Use real before and after shots.
- ID, visa and passport photos. These must show you as you are. Do not edit them.
- Candid photos with other people in them. One perfect smile in a group of ordinary ones is the first thing the eye finds.
- Photos where the teeth are not the problem. A blurry mouth or heavy shadow will not improve with straightening. Retake the photo, or fix the light first.
Frequently Asked Questions
Can AI straighten teeth in a photo?
Yes. An AI editor can even out a crooked row, close a small gap and fix a chipped edge in a photo. It works on the picture only, so your real teeth stay the same.
Why do my teeth look fake after editing?
Usually one of three causes: the teeth are brighter than the whites of your eyes, a front tooth got wider than its partner, or the row is too perfect for your face. Check shade, width and midline.
How do I close a gap between my front teeth in a picture?
Upload the photo to a teeth fixer and run the edit, then compare the two front teeth. Closing a gap makes them take more room, so confirm they still look like a natural pair.
Is it free to fix teeth in a photo online?
Many tools offer a free try. Check the current terms on the tool page before you upload, since free limits change.
Is it okay to edit my teeth in a profile photo?
For a social or LinkedIn photo, a light edit that still looks like you is fine. For official documents and dental advertising, do not edit teeth.
Keep the smile, fix the tooth
Upload your photo to the AI Teeth Fixer, then run the four checks on the result. If a check fails, run it again.
Try the AI Teeth Fixer →